Help Desk and tickets
An e-mail alert tells a person. A ticket lands in the queue of the team that fixes the problem, with a number, a deadline and a history. CMS opens that ticket on its own when an alert fires, in the service tool the company already uses — and it also lets any authorised person open one from a failed message, already filled in with the integration’s context.
CMS only opens the ticket. It does not comment on it, close it or read it back: the lifecycle belongs to the service tool. The ticket number is kept in CMS, alongside the message that opened it.
How the pieces fit together
There are three records, created in this order:
- The tool — under Settings › Parameters › Help Desk. Activating it creates everything sending needs: the tool’s Application, the Interface, the Delivery, the Transformer and the Credential.
- The destination — under Integration Config › ITSM Configuration. It is the to whom inside the tool: the service group, the category, the urgency. The same tool usually has several destinations, one per area.
- The alert — under Alerts, the Open a ticket in field picks the destinations for each alert configuration.
Underneath, opening a ticket is delivering a message: CMS builds the body, puts it on the tool’s Delivery, and the message follows the same path as any other — retries, log, Messages screen. There is no special connector per tool, and that is why the ticket’s message shows up in Messages as proof that it went out.
Supported tools
| Tool | What it opens | Authentication | Ticket number in the response |
|---|---|---|---|
| ServiceNow | Incident, through the Table API | User and password | result.number |
| Jira Service Management | Portal request, through the Service Desk API | Atlassian account e-mail + API token | issueKey |
| Freshservice | Ticket, through API v2 | API key in place of the user | ticket.id |
| Zendesk | Ticket, through the REST API | email/token + API token | ticket.id |
| GLPI | Ticket, through the REST API (apirest.php) | Login → Session-Token | id |
| InvGate Service Desk | Incident, through API v1 | User and password | id |
| SAP PM | Maintenance notification (BAPI_ALM_NOTIF_CREATE) | The Application’s SAP Connection | NOTIFHEADER_EXPORT.NOTIF_NO |
Each tool lists, in the activation popup, the prerequisites on its side — the itil role in
ServiceNow, the API turned on in GLPI, the API token instead of the password in Jira. It is worth
reading before filling anything in: most first-setup failures are right there.
1. Activate the tool
Settings › Parameters › Help Desk tab.
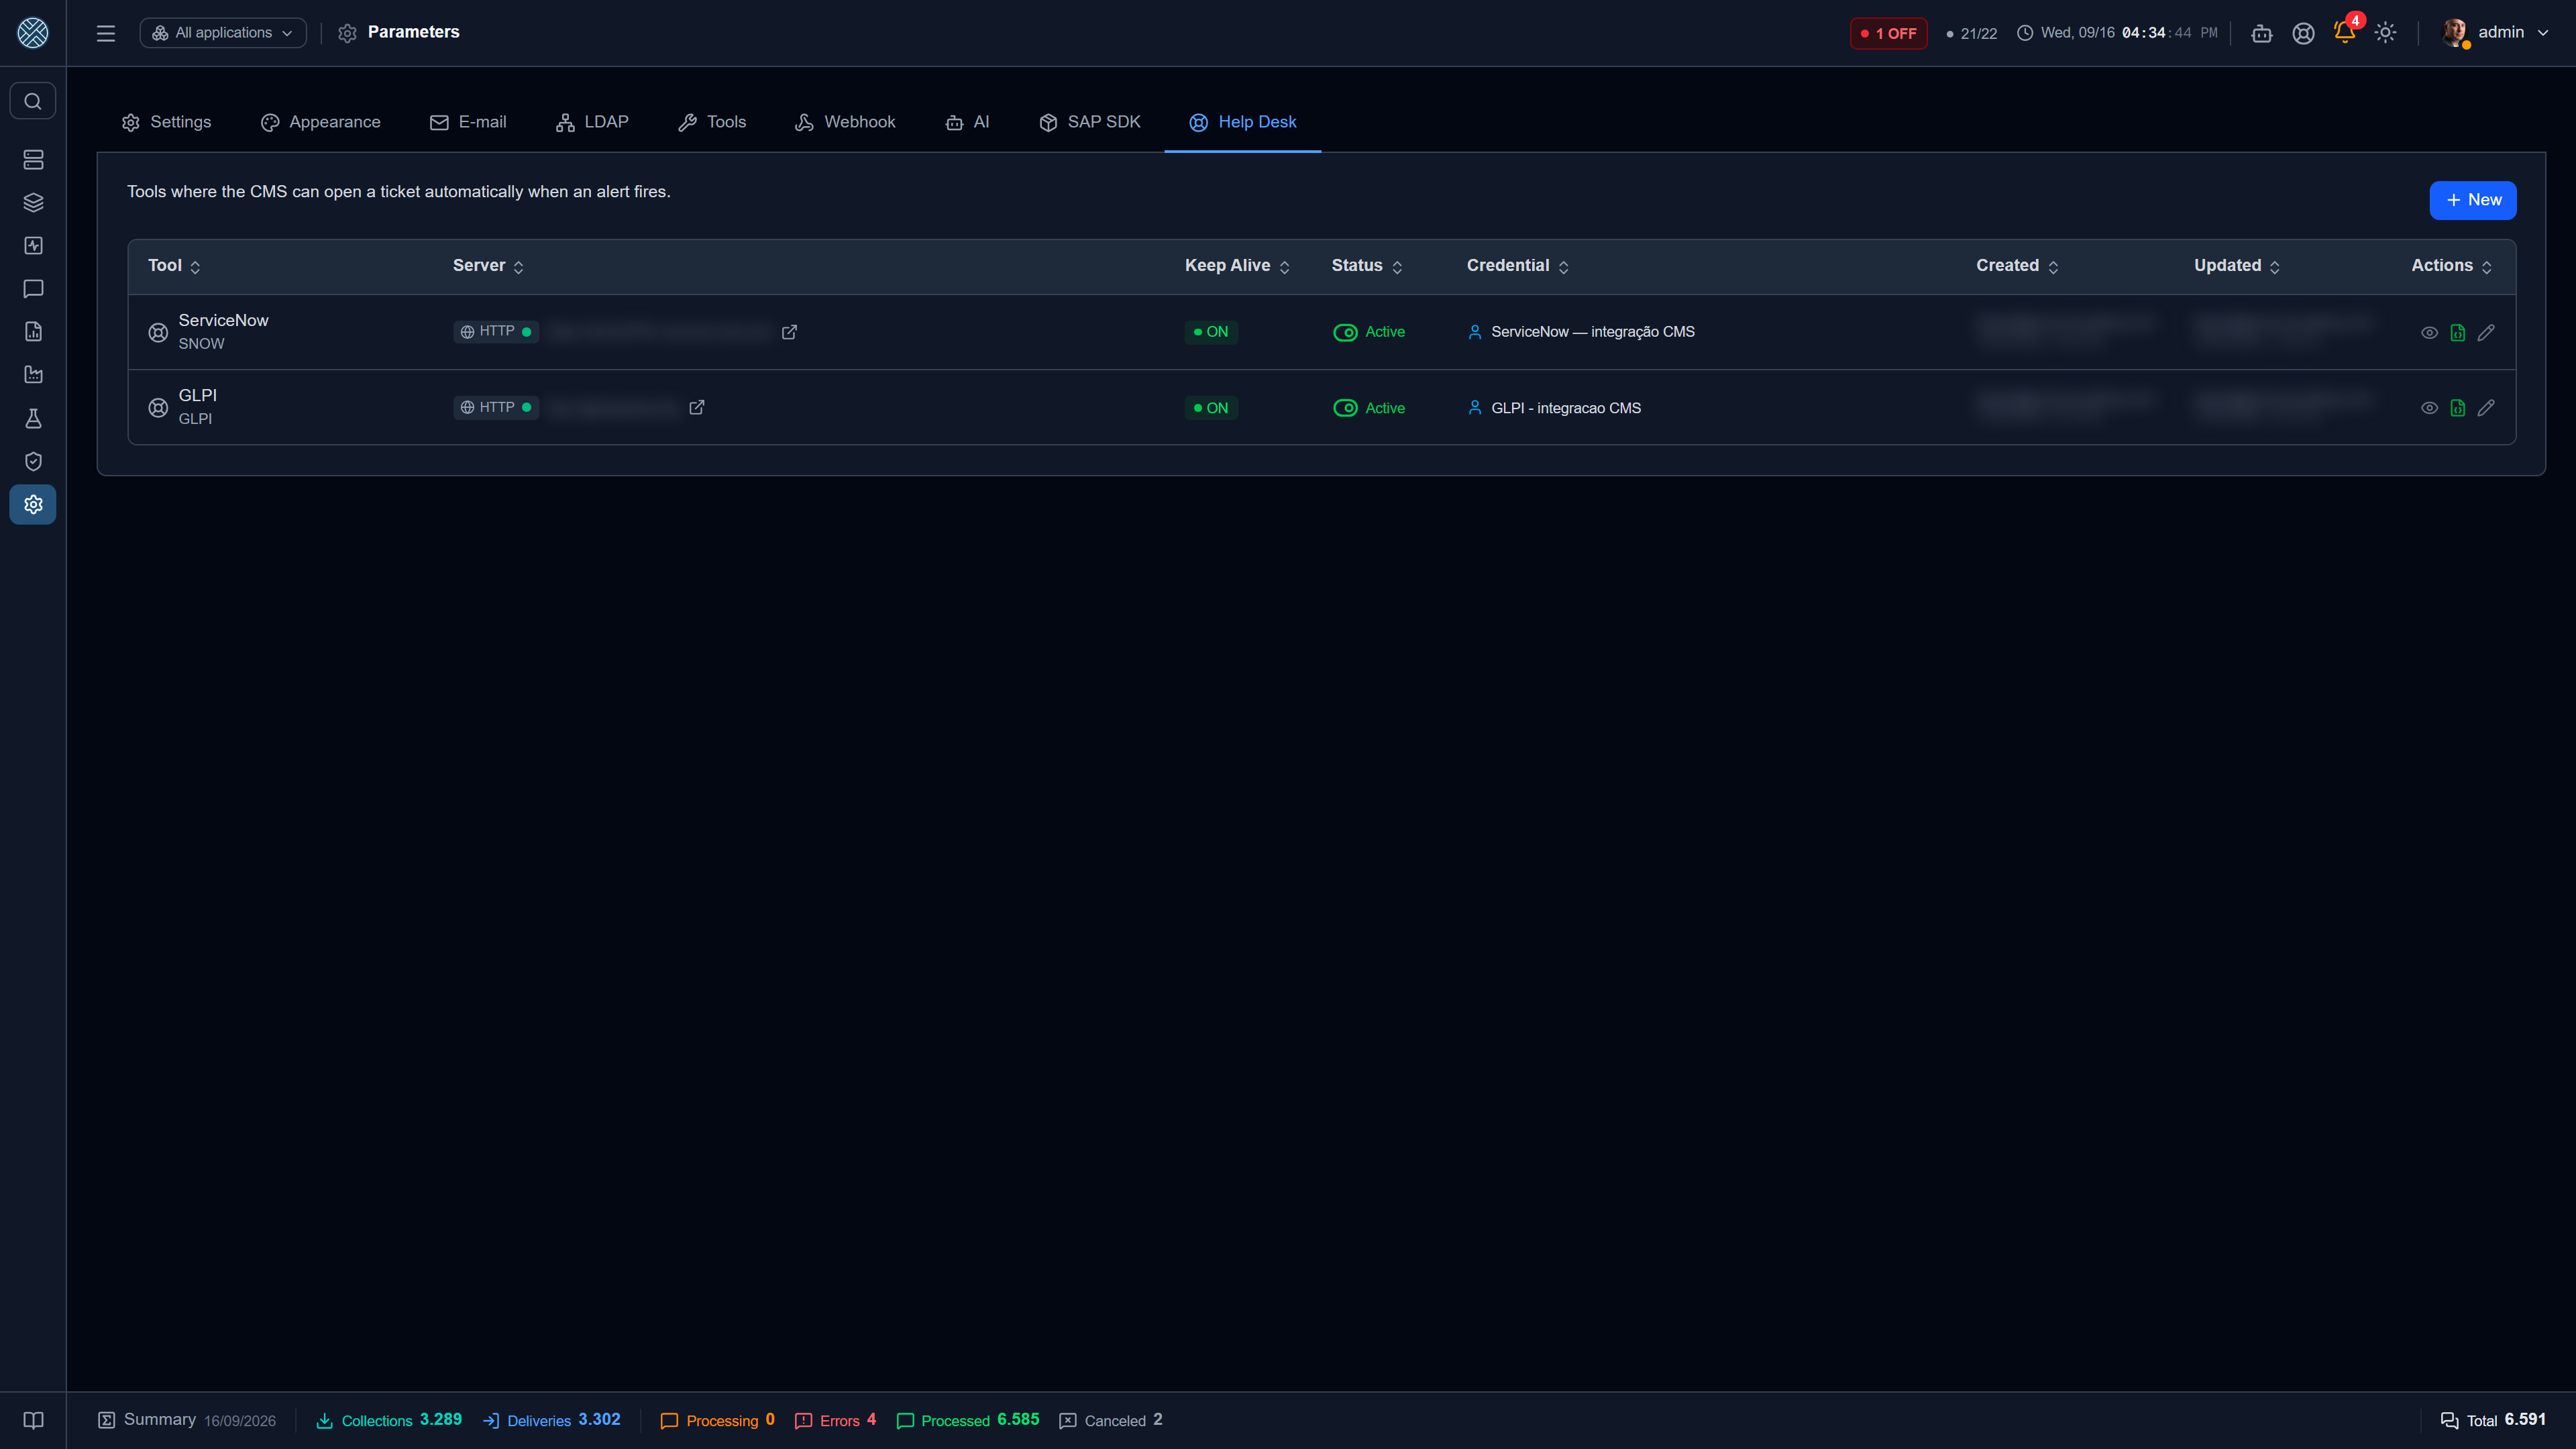
The Activate button opens the catalogue. Each tool shows up with a description of what it opens, and once you pick one the popup asks for:
| Field | What it is for |
|---|---|
| Tool base URL | The instance address — e.g. https://yourcompany.service-now.com |
| Acronym | Comes from the catalogue (GLPI, SNOW…). On a second activation of the same tool, choose another one (GLPIQA). Once activated it does not change (padlock): it is the tool’s name in Interfaces, Message Definition and the message filters |
| CA certificate | Optional, for an internal instance with its own certificate |
| Authentication | The recommended type comes preselected. The Outbound Credential is created from these values and linked to the Delivery; you edit it later under Credentials |
| Interface: Channel or Queue | How tickets go out — see below |
The What the activation creates block shows, before you confirm, the Interface and the Delivery that will exist. The choice between Channel and Queue deserves attention:
- Channel (recommended): a ticket rejected by the tool does not hold up the next ones. Tickets have no order among themselves, so this is the right behaviour in most cases.
- Queue: one ticket at a time, in arrival order. If one is rejected, the next ones wait until someone unblocks the Interface — right when the tool is having trouble.
The names created are in English and derive from the acronym: the Interface GLPI_TICKET, the
Delivery GLPI_TICKET_OPEN, the Transformer “GLPI GLPI - ticket body” and the Credential “GLPI — CMS
integration”. English names are the standard for everything the activation records; the screen texts
stay in each user’s language.
The same tool can be activated more than once — a production GLPI and a QA one, for example.
Each activation is its own Application, with its own acronym, and so its own names
(GLPIQA_TICKET, GLPIQA_TICKET_OPEN). If any of the names already exists, the activation refuses
and says which one: it never reuses another activation’s Interface or Delivery.
The Interface and the Delivery come from the tool’s pack, and only the activation installs that pack. The ticket packs do not show up in the Applications pack assistant: installed on a plant Application, they would become a stray ticket Delivery, with no Destination and outside this catalog.
SAP PM
SAP PM is different from the other tools: it does not create an Application. The activation asks for the SAP Application where notifications will be opened — the combo only lists Applications of type SAP RFC/BAPI — and that choice can be changed later, when editing. SAP PM can also be activated more than once, one per SAP Application.
Instead of “What the activation creates”, the screen shows the Delivery that opens the
notification in that Application: the SAP RFC Delivery that calls BAPI_ALM_NOTIF_CREATE, found by
the function (its code can be anything). The SAP PM pack ships that
Delivery ready. For the notification to really exist, three things must be in place on it:
BAPI_ALM_NOTIF_SAVEunder “Call next, in the same session”. The create BAPI only keeps the notification in the RFC session’s memory; without the save in the same session, the notification vanishes when the connection closes. See follow-up calls.- Commit on — the
BAPI_TRANSACTION_COMMIT, in the same session. - The Interface’s scheduler on, in Schedulers. When it is off, the notification enters the queue and stays there, and “Open ticket” shows “waiting” forever.
The activation and Test connection check all three and say what is missing — the activation refuses while anything is missing.
The grid
| Column | What it shows |
|---|---|
| Tool | Icon, name and acronym |
| Server | The connection type badge, as in Applications, and the URL. Clicking the badge opens the connection details |
| Keep Alive | Whether the tool is responding |
| Status | Active or inactive. Clicking toggles it, with a typed confirmation (ACTIVATE / DEACTIVATE) |
| Credential | A person icon (user and password) or a key icon (token, API key) |
| Created / Updated | Who activated it and who changed it last |
The row actions are Details (the Application, Interface, Delivery and Credential that were created), the Body template — green when the tool already has one registered — and edit, which is where Test connection lives.
Deactivating a tool only stops new tickets. Destinations, Interface, Delivery and the ticket history stay intact, and reactivating brings everything back as it was.
Test connection
The button, in the tool’s edit popup, performs a real read on it — without opening a ticket — using the Delivery’s Credential. The result has three states:
- Green: the tool accepted the credential and the read.
- Red: with the reason.
401means user or password rejected;403means the credential was accepted without the permission that opening a ticket requires, and the screen says which one (theitilrole in ServiceNow, API access on the GLPI profile). - Warning: the tool has no read in CMS that confirms the credential (that is the case for InvGate). The test passes with a “not verified” note — the first ticket is what confirms it.
In SAP PM the test is different: it checks the Delivery that opens the notification, the save in the same session, the commit and the Interface’s scheduler — see SAP PM.
In ServiceNow, the e-mail you use to sign in to the developer portal (ServiceNow ID) is not
an instance user: with it the test comes back 401. Use a user created inside the instance,
preferably an integration user rather than admin.
Body template
Each tool has a body template: the ticket’s JSON (or XML) in the format that API expects, with the alert fields in place of the values. It is edited here, with the fields panel next to the editor, and it has two roles:
- It is the starting point for every new destination of this tool — except in SAP PM, where the body starts from the Delivery Definition fields.
- It is the body sent by a destination that has no body of its own.
The editor opens with a sample from the tool only as a starting point — Use the tool original template restores it. The sample is never sent on its own: with no saved template and no body on the destination, the ticket does not go out, and the history records the failure.
2. Configure the destination — /ticket-destinations
Integration Config › ITSM Configuration.
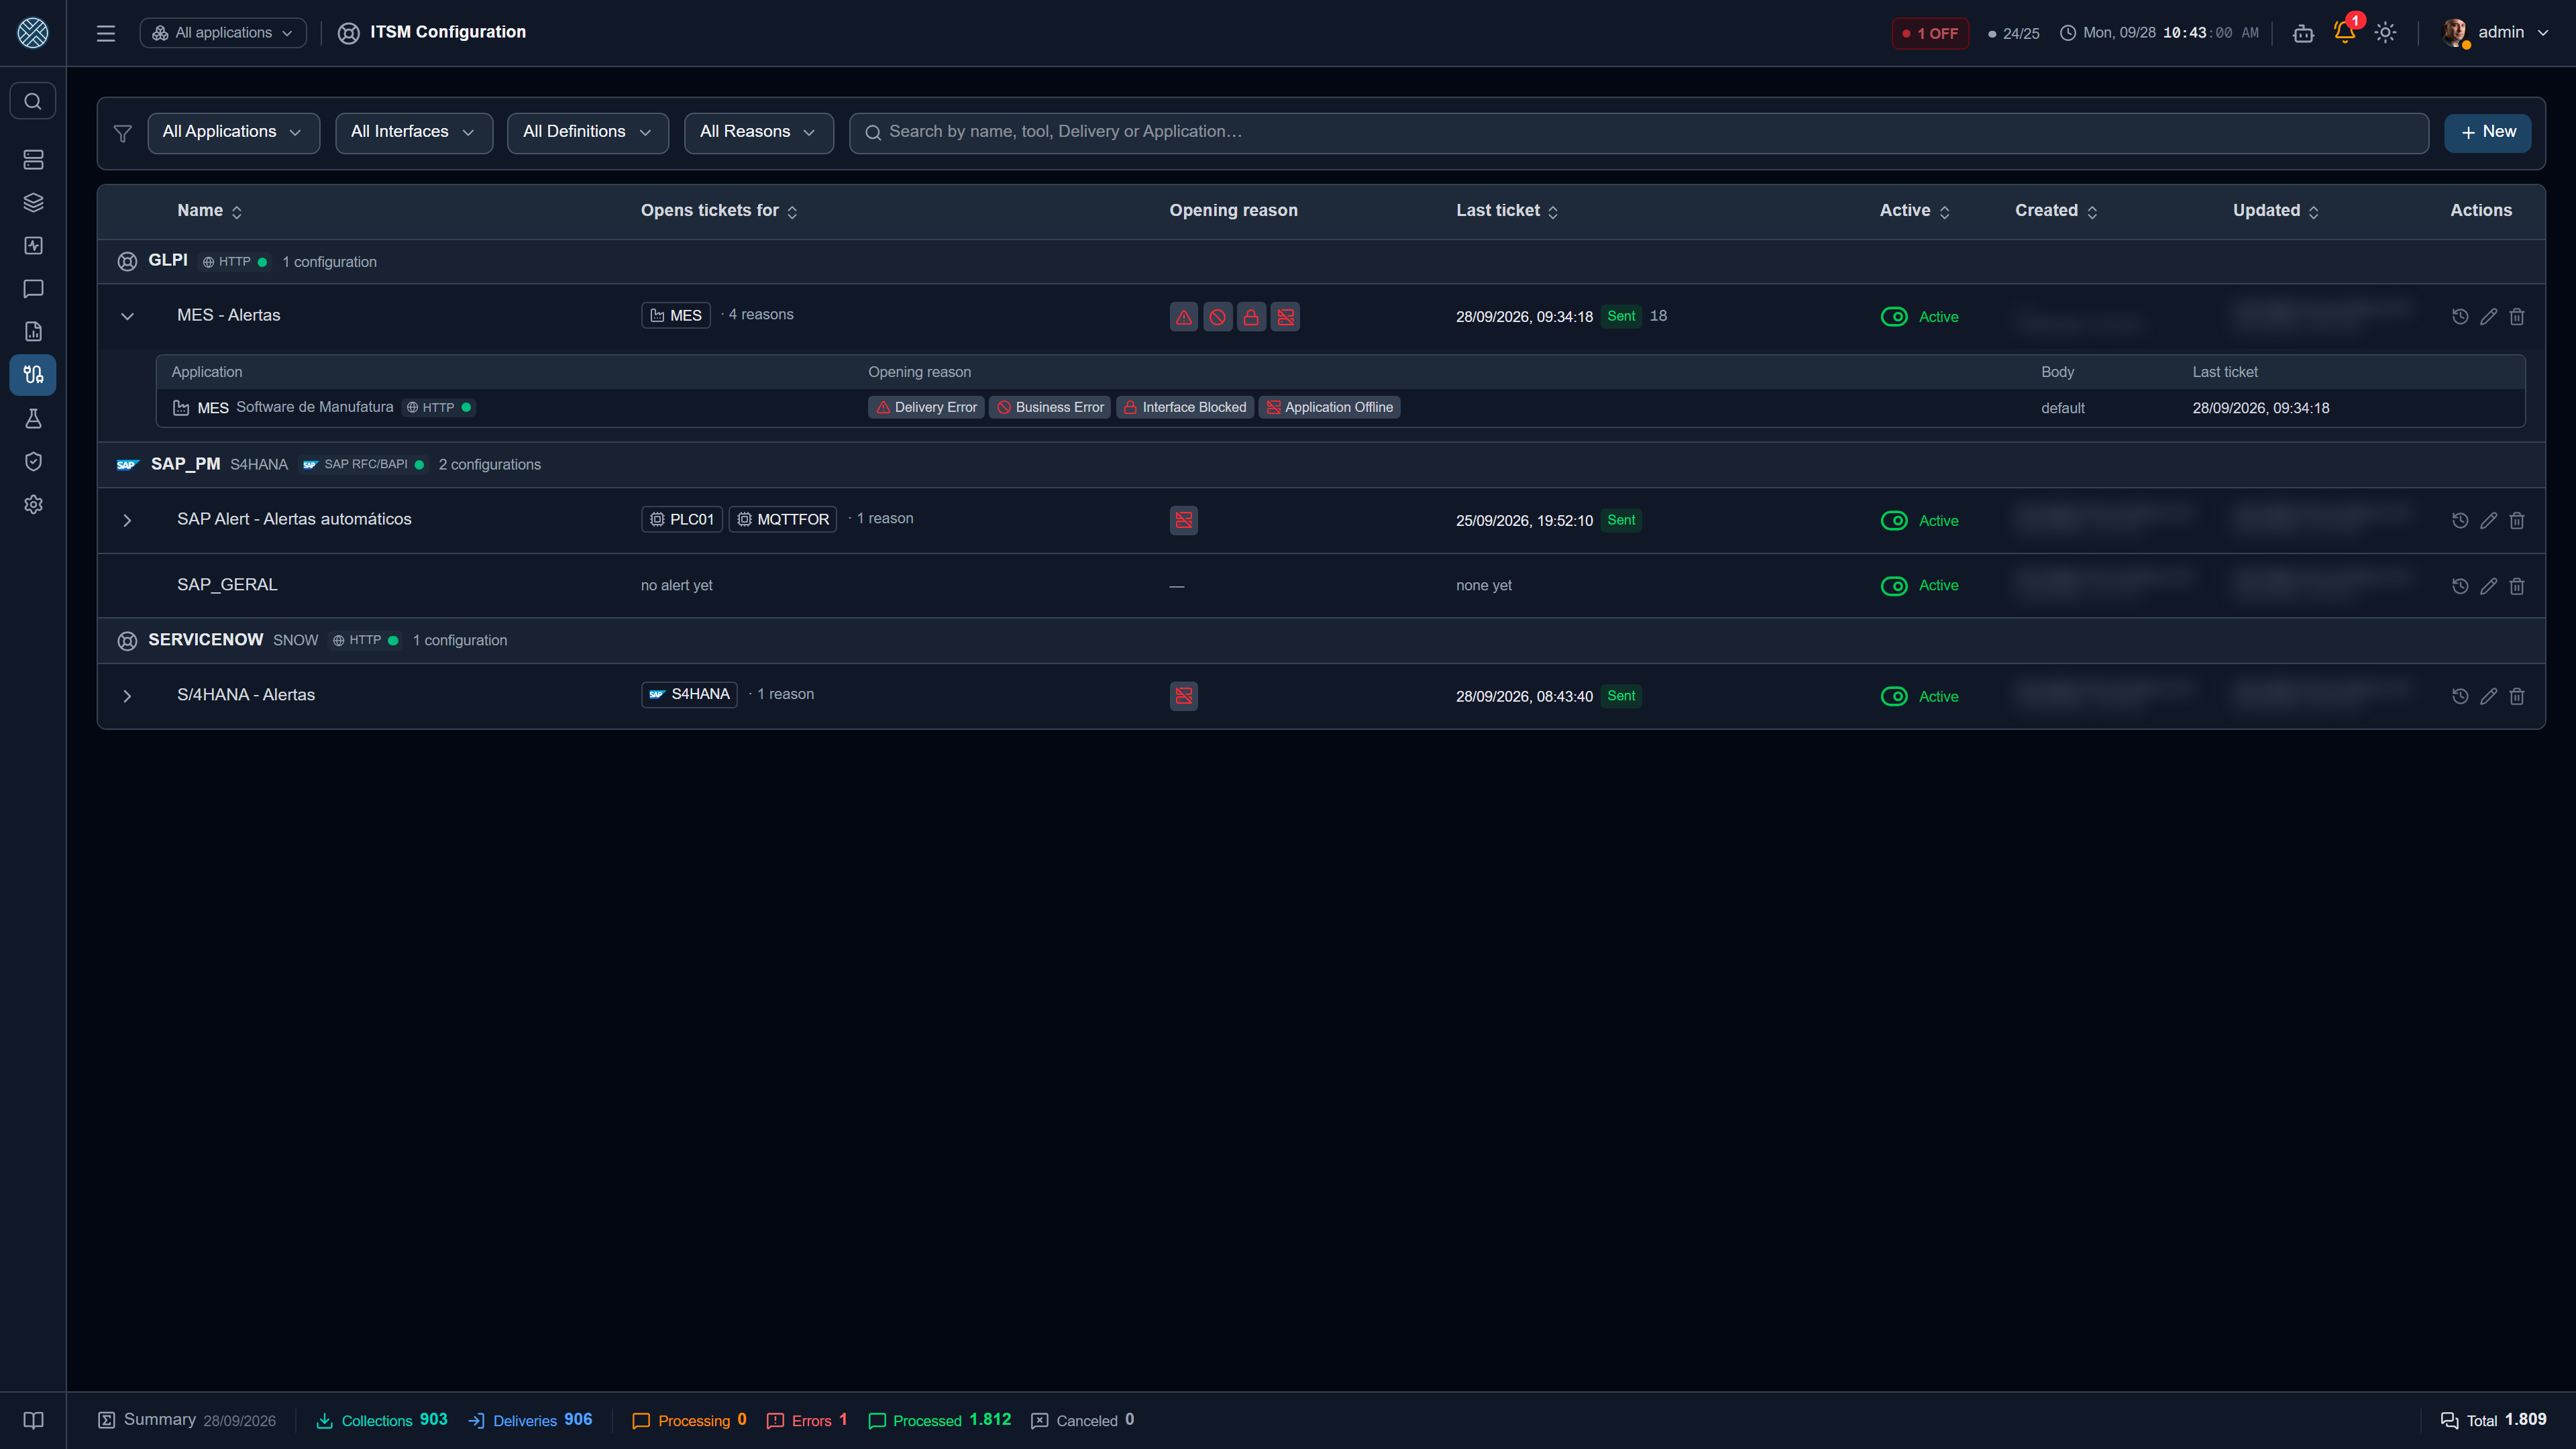
A destination answers where, inside the tool, the ticket goes. The typical case is the same GLPI with one destination for Electrical Maintenance and another for IT — the group, the category and the urgency change.
The grid groups destinations by tool: each group header shows the Help Desk, the connection badge (which opens the details) and how many configurations it has. Each row is one configuration, on a single line:
| Column | What it shows |
|---|---|
| Name | The destination’s name |
| Opens tickets for | The codes of the Applications whose alerts use the destination (up to three, then “+N”) and how many reasons. With no alert, “no alert yet” |
| Opening reason | The icons of the linked alert types, with the name in the tooltip |
| Last ticket | Date, status and number of the last ticket. Clicking opens the opened tickets |
| Active | Turns the destination on and off with one click |
The arrow at the start of the row opens the detail: each Application with its connection, its own reasons, whether it uses the default body or a body of its own and when it last opened a ticket. That is where “which reason makes MES open a ticket?” gets answered — the row’s column merges the reasons of every Application and does not say which is whose.
The Application, Interface, Definition and Reason filters apply per Application: “MES + Application Offline” only shows the destination if MES itself opens a ticket for Offline. With any of them on, rows open with the detail already showing, and Applications outside the filter appear dimmed at the end — the destination still serves them, and whoever is about to change it needs to see that. The text search also finds a reason by name (“offline”).
The actions column holds Opened tickets, edit and delete.
The form
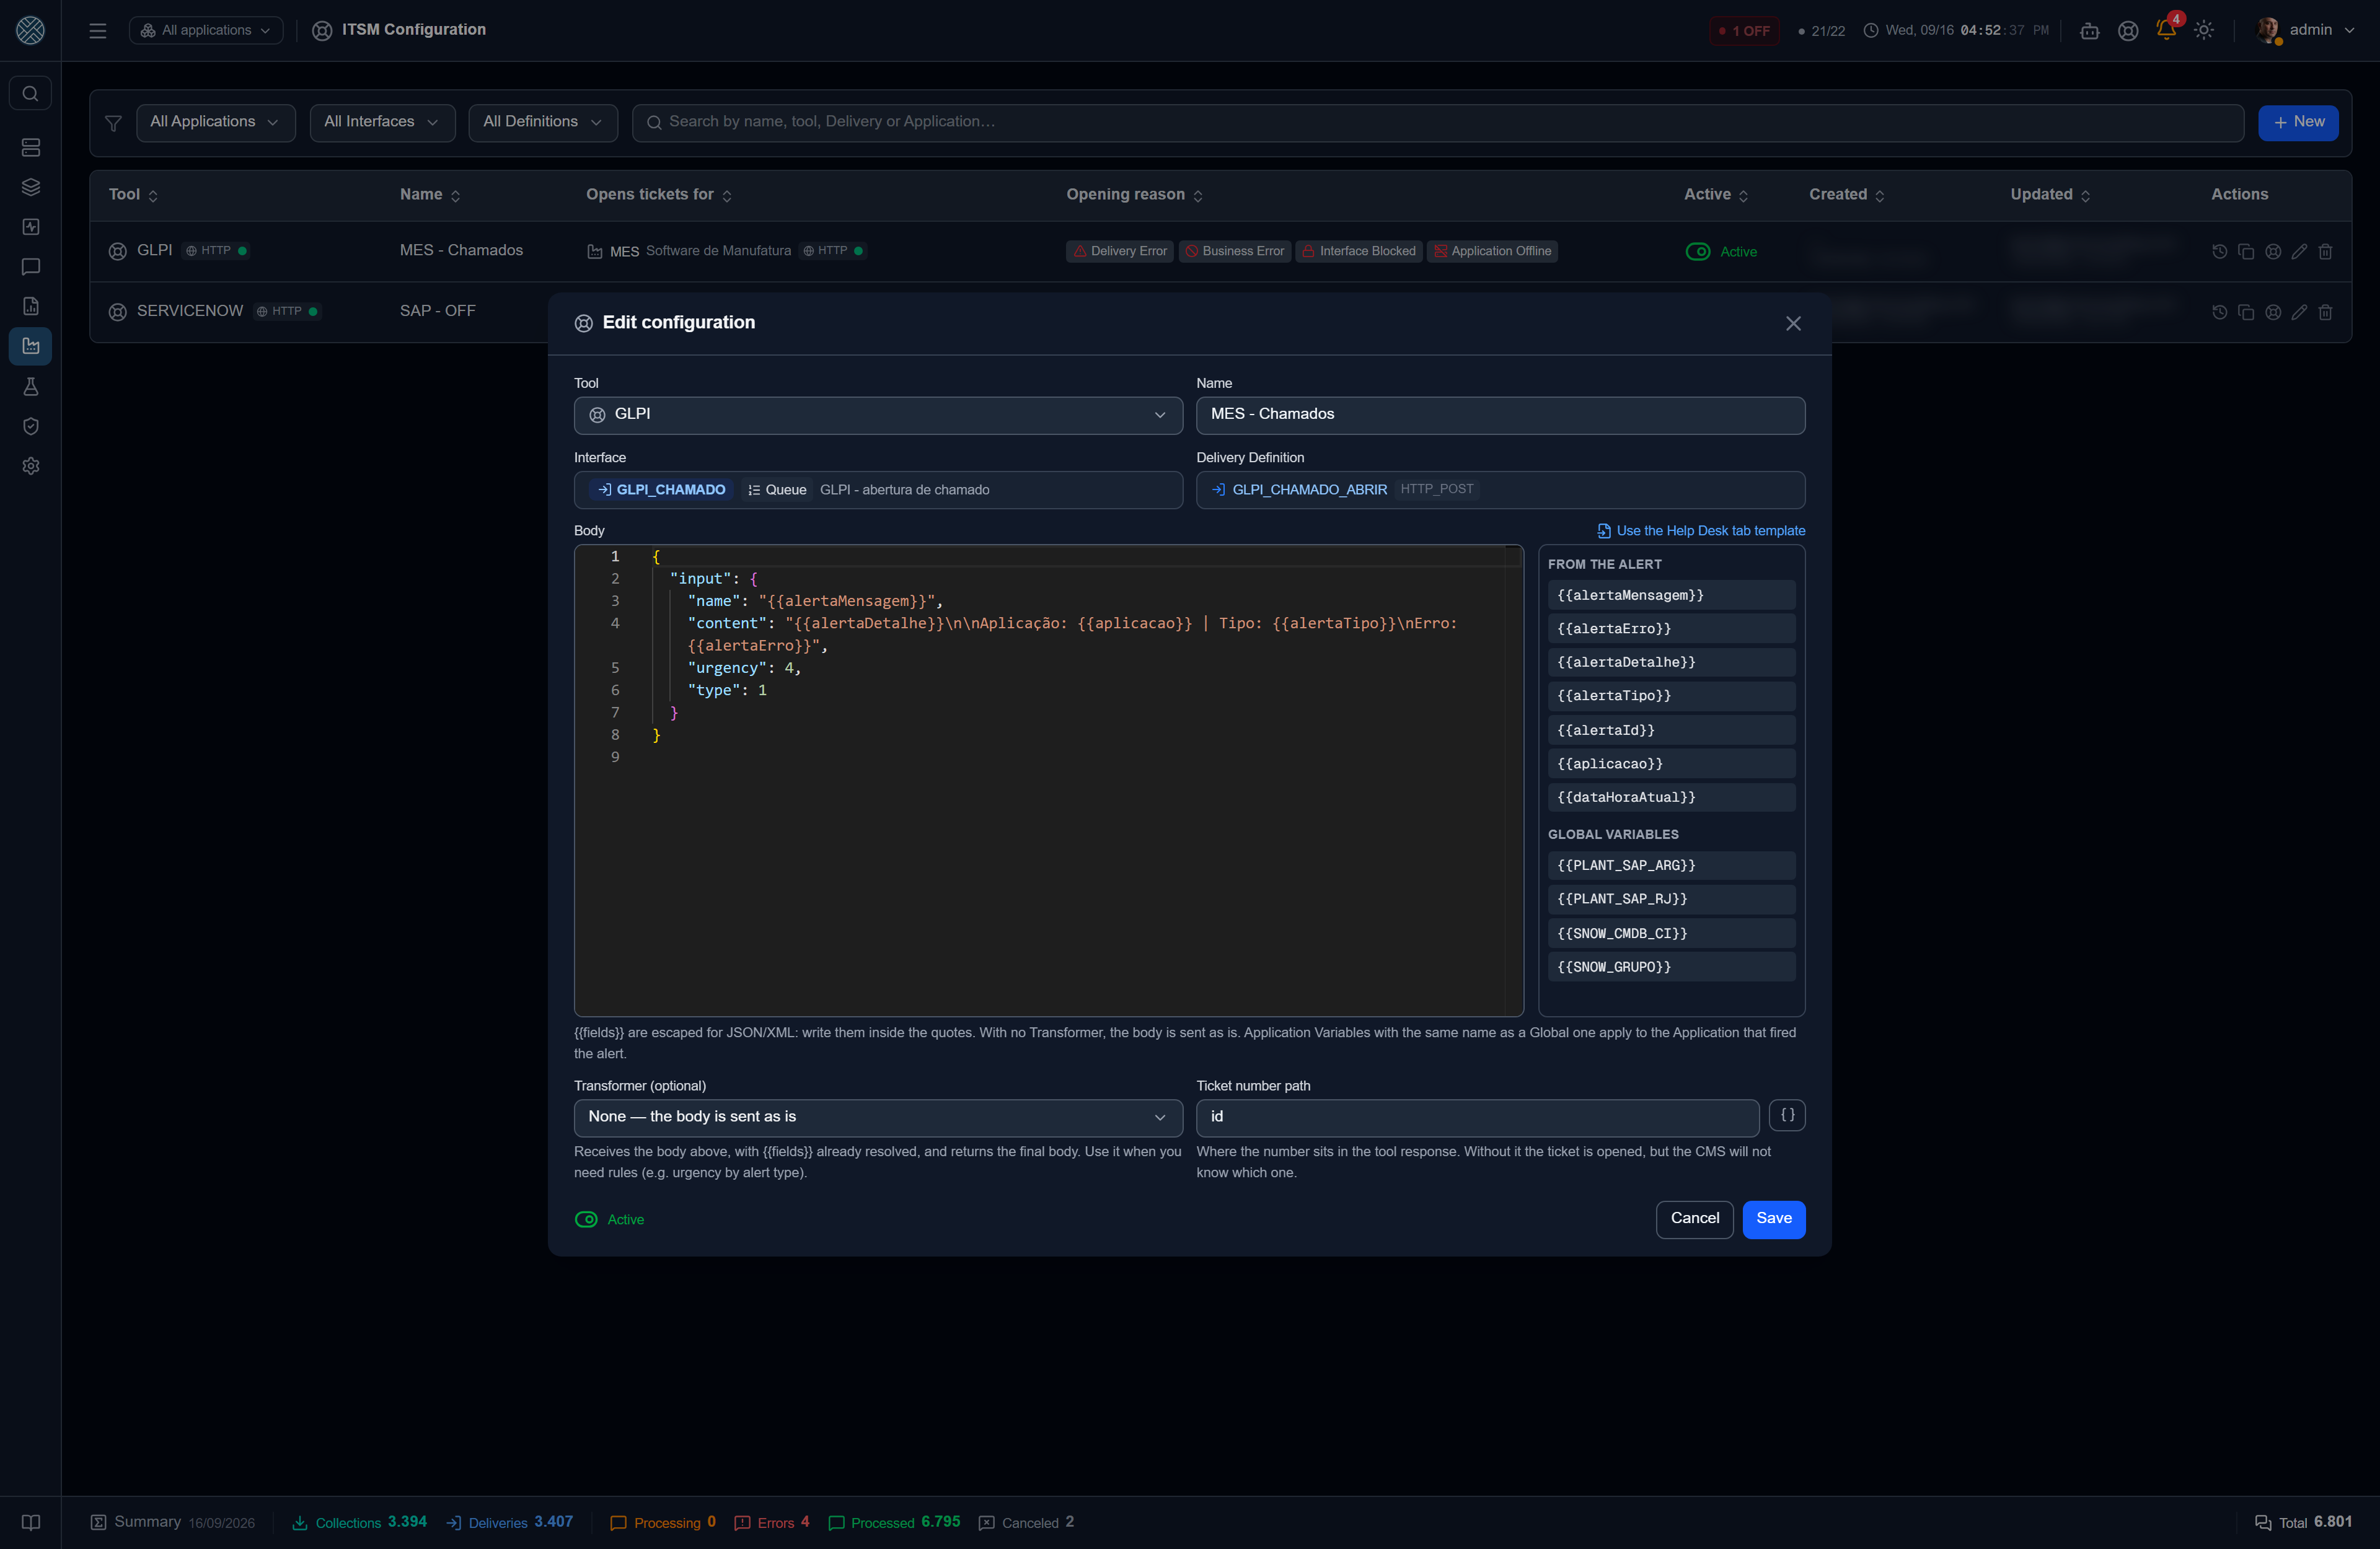
| Field | What it is |
|---|---|
| Tool and Name | Which activated tool, and a name that says the area — e.g. “GLPI – Electrical Maintenance”. The tool only comes preselected when a single one is active; with several, the choice is yours |
| Interface and Delivery Definition | The tool’s Delivery, with the Interface description in the combo. When there is only one, it comes preselected. In SAP PM, only the Delivery that opens a notification (BAPI_ALM_NOTIF_CREATE) is accepted |
| Body | The ticket, in the tool’s format, with the {{fields}} |
| Transformer (optional) | A rule applied to the body before sending — see below |
| Ticket number path | Where the number sits in the response. Suggested by the catalogue |
| Active | An inactive destination opens no ticket |
| Available for manual opening | On (the default), the destination shows up in a failed message’s Open ticket and is no longer offered in alert settings. Off, it belongs to alerts only. An automatic-alert destination (“MES - Alerts”) usually stays off; one for opening by the operator, on |
Tool, Name and Delivery are required, and the error shows up on the field itself. Saving does not close the form: the screen confirms it saved and asks whether you want to keep editing or close.
The body. A new destination opens with the Help Desk tab template. When you edit a destination, the editor shows the body that was saved — the template only comes back through the Use the Help Desk tab template button, which asks for confirmation when there is already text in the editor. Nothing is stored until Save.
In SAP PM the starting point is different. The notification goes through no Transformer: the
Delivery takes a JSON with its own input fields (descricao, equipamento, localInstalacao,
prioridade…). So the body opens with the fields of the chosen Delivery Definition and follows
when the Definition changes — an SAP Application has several Deliveries, each with its own fields.
Fill the values with the alert fields; the Use the Delivery Definition fields button brings them
back. A template registered in the Help Desk tab is still available through its own button.
Body per Application
The same destination often serves several Applications, and the body is not always the same — the SAP PM equipment, the ServiceNow CI. Above the editor sit the Default tab and one per Application: an Application’s body applies to its alerts, and the others use Default. In the new-tab combo, the Applications that already use the destination come first.
On an Application’s tab, the side panel also shows that Application’s Variables, besides the alert fields. Deleting the tab sends the Application back to Default.
Clicking a field in the side panel writes the {{field}} where the cursor is. The panel is as tall as
the editor and scrolls on its own when there are many variables.
Three rules apply to the body:
- Write the fields inside the quotes:
"name": "{{alertaMensagem}}". The value goes in escaped for the Delivery’s format (JSON or XML) — a quote or a line break in the alert message does not break the ticket. - JSON is checked on save, with the fields swapped for a neutral value. A stray comma shows up now, not on the first ticket.
- Variables work in the values:
{{SNOW_GRUPO}}from a Global Variable, or from an Application Variable with the same name, resolved against the Application that fired the alert. That is how the same destination carries the right CI for each Application.
An identifier is a number, not a name. In GLPI, itilcategories_id and _groups_id_assign
expect the id of the category and of the group. With the name instead ("infrastructure"), GLPI
does not reject it with a clear message: it breaks with HTTP 500 and “An unexpected error occurred”.
The same goes for ServiceNow’s assignment_group, which expects the group’s sys_id.
A minimal body for GLPI:
{
  "input": {
    "name": "{{alertaMensagem}}",
    "content": "{{alertaDetalhe}}\n\nApplication: {{aplicacao}} | Type: {{alertaTipo}}\nError: {{alertaErro}}",
    "urgency": 4,
    "type": 1
  }
}
Body fields
| Field | What it carries |
|---|---|
{{alertaMensagem}} | The alert message — e.g. “Application MES is offline”. In a manual ticket, the Title |
{{alertaErro}} | The technical cause: the keep-alive error, the delivery error or the Business Error found. It is what support reads first |
{{alertaDetalhe}} | The rest of what the alert knows, on one line (httpStatus: 500 | mensagemId: 1234). In a manual ticket, the Description |
{{alertaTipo}} | The alert type — e.g. APLICACAO_OFFLINE |
{{alertaId}} | The id of the alert occurrence, for a correlation_id. In a manual ticket, M followed by a number |
{{aplicacao}} | The code of the Application that fired it |
{{dataHoraAtual}} | Date and time of sending |
{{NOME}} | Any Global or Application Variable |
{{dado.campo}} | Only in the Condition Met alert: the field of the collected data that fired it — e.g. {{dado.equipamento}}, {{dado.tags.Status}} |
The optional Transformer
Without a Transformer, the body goes out as it is — that is the normal path. The Transformer is for when the ticket needs a rule: urgency depending on the alert type, group depending on the error text. It receives the body with the fields already resolved and returns the final body.
The combo lists the Global Transformers and those scoped to this Delivery. The Delivery’s own
(installed by the tool pack) comes first, and it expects a different format: the contract fields
(titulo, descricao, urgencia…), not the tool’s JSON. When you pick it, the screen says which
fields it expects and offers Use this Transformer input format, which rewrites the body in that
format — with confirmation, like the template button. Transformers of other ticket tools do not
show up.
A destination created before September 2026 may be in the old Fields mode. It keeps working as it is, and the screen warns you when it opens. Saving it from the screen converts it to the body shown in the editor — check group, category and the other values first.
Opened tickets
The history icon opens the destination’s last 50 tickets, in a paginated grid, with search by ticket number. Each row carries date, number, origin (the alert, or “Opened manually by” whoever opened it) and the state:
| State | Means |
|---|---|
| Sent | The message went out. The number shows up as soon as the tool responds |
| Delivery failed | The message was created, but the tool rejected it — the error is in the message |
| Failed | Opening failed before reaching the Delivery (e.g. no body and no template) |
| Skipped | CMS decided not to open it, and says why — see the rules below |
The message icon opens the message summary, the same popup as in Messages, with the body sent and the tool’s response.
3. Link the destination to the alert
In the alert configuration, under Alerts, the Open a ticket in field lists the destinations, each with the tool’s icon, acronym and description — so it is clear in which system the ticket will open. An alert can open a ticket in more than one destination at the same time (a ticket for IT and a notification in SAP PM, for example).
For Application Offline, Only open a ticket after (minutes) also shows up, with 5 as the default: the e-mail goes out immediately, and the ticket only if the Application is still down after that time. A network blip of a few seconds does not become a ticket in the support queue. Zero opens it together with the alert.
The firing rules
- One ticket at a time. Once a ticket is open for a pair (alert configuration, destination), the same problem does not open another. The lock is released when the recovery alert arrives — Application Online or Interface Unblocked — and a new problem after that opens a new ticket.
- Condition Met is per occurrence. The condition alert already fires only once per crossing — and, split by key, once per piece of equipment. That is why it does not use the lock above: with it, furnace 2’s notification would wait for furnace 1’s to be normalized.
- Recovery does not open a ticket. The recovery alert only releases the lock; the team closes the ticket, in the tool.
- The tool does not call for help on itself. If the alert is about the tool itself (ServiceNow went down), opening a ticket in it would make no sense: the firing is recorded as Skipped, and the warning goes out by e-mail even if the configuration has no e-mail ticked.
- One destination does not hold up the others. If one destination fails, the others for the same alert open normally.
Open a ticket right away
Not every problem starts with an alert. Whoever sees something wrong can open the ticket directly.
From a failed message
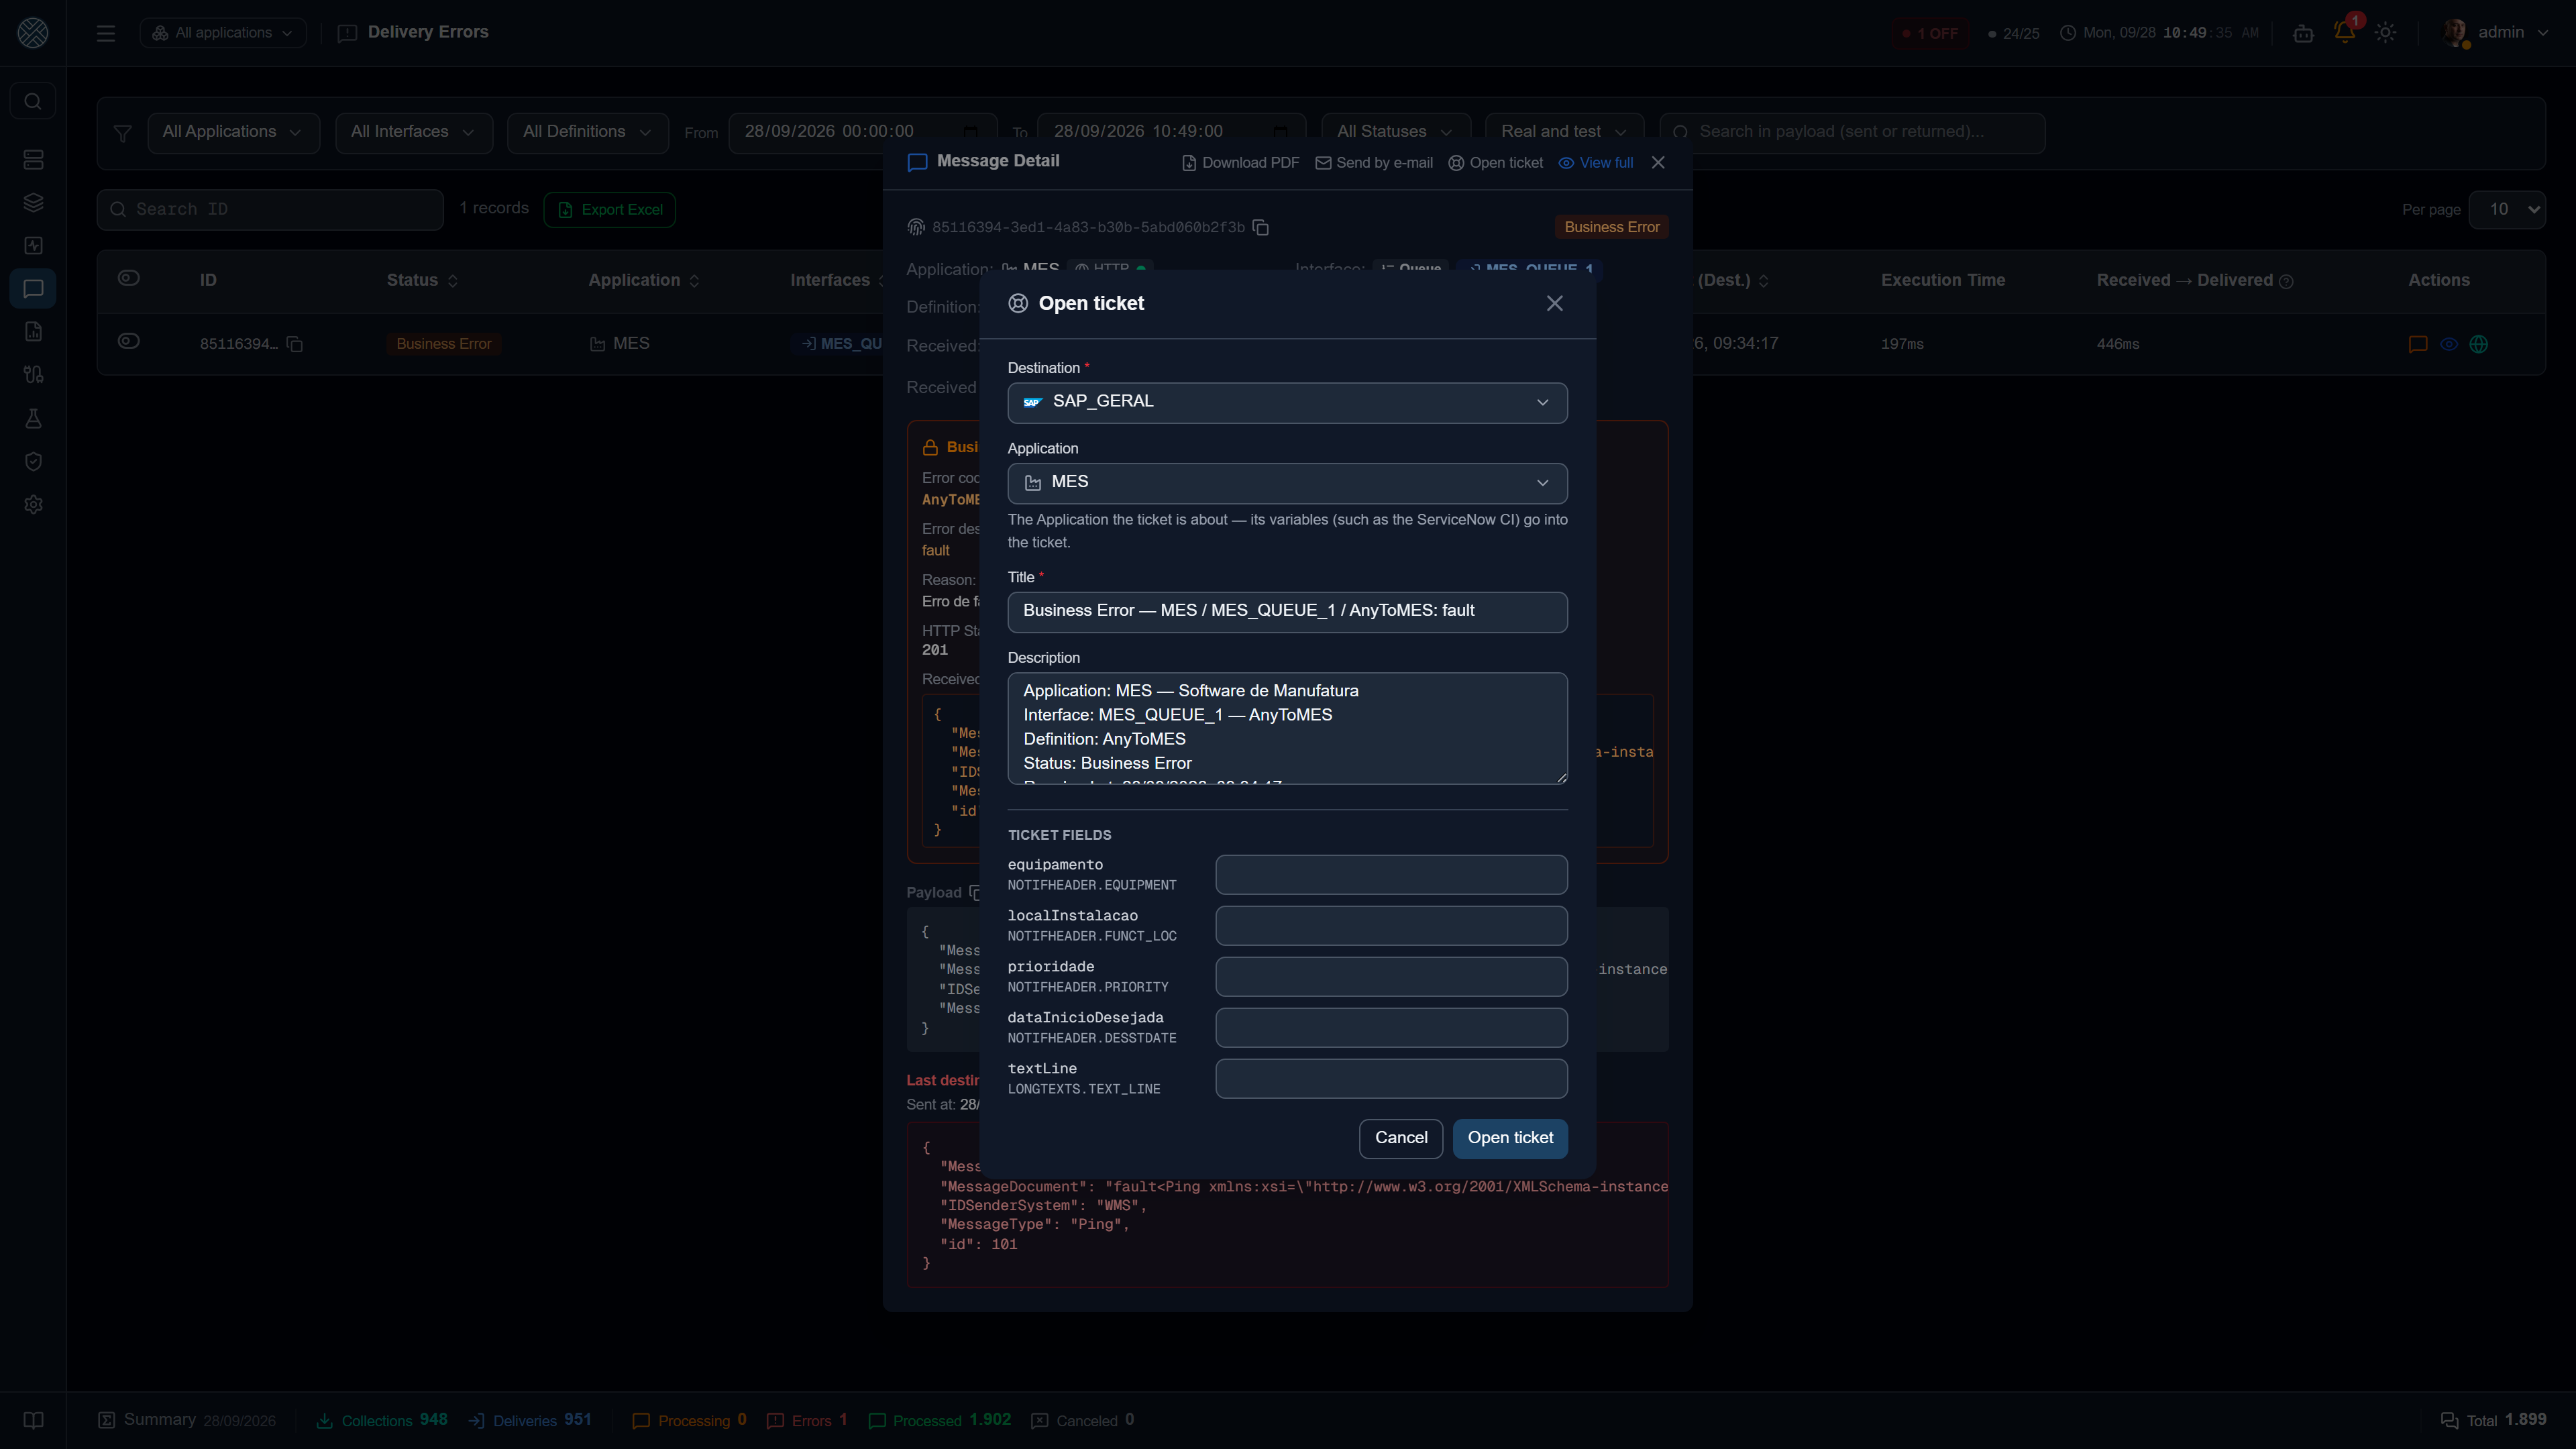
On a message in Delivery Error, Business Error or Collection Error, the Open ticket button shows up next to PDF, Send by e-mail and Resend — in the message popup under Messages and on the detail page. It only shows up for users with the Open Ticket Tool on their profile, and when there is at least one active destination. A message that is itself a ticket does not offer the button.
That is where manual opening makes sense: anyone can fill in a blank form directly in the service tool; what CMS adds is the integration’s context. So the popup comes already filled in — and everything stays editable:
| Field | Comes filled with | Goes into |
|---|---|---|
| Destination | The active destination, when there is only one | — |
| Application | The message’s Application, if the user is allowed to see it. Its Variables go into the ticket — like the CI in ServiceNow | {{aplicacao}} |
| Title | The status, where it happened and the error — e.g. Delivery Error — MES / MES_Q1 / ENVIA_OP: … | {{alertaMensagem}} |
| Description | Application, Interface, Definition, status, received date, HTTP, error and the message link (which asks for login, like any page) | {{alertaDetalhe}} |
| Destination fields | Empty | The keys the destination body leaves empty — "equipamento": "", "localInstalacao": "" — become popup fields, and what the operator types goes into those keys |
The destination fields follow the body per Application: changing the Application changes the fields. The operator only fills in what the destination left open — a value fixed in the body is not overwritten, and the popup does not create new keys. It is the way to open a PM notification with the equipment that only someone on the floor knows.
Only destinations with Available for manual opening on show up in the popup.
Open ticket shows a confirmation with the summary before sending. After sending, the popup follows the tool’s response and shows the ticket number as soon as it arrives — or the reason, if the tool rejects it. From there you can open another or, with access to ITSM Configuration, see the opened tickets.
The description only shows up in the ticket if the destination’s body uses {{alertaDetalhe}}. A
destination whose body lacks that field opens the ticket without it.
Manual opening stays outside the one-ticket-at-a-time lock: whoever clicks wants a ticket now, and the automatic one can still open its own later.
Where the tool shows up in the rest of the system
The activated tool is an Application in the Help Desk category. It shows up where it helps follow the sending, and stays out of where it would only get in the way:
| Shows up | Does not show up |
|---|---|
| Interfaces and Message Definition, as the Help Desk category, after Files | Applications — it is created and removed from the Help Desk tab |
| Messages filters (Application, Interface and Definition) | The header’s Application in focus selector |
| Transformers, to adjust the pack mapping | The Triggers, Test Bench and Test Plans combos |
| Schedulers, in a group of their own, Help Desk — the Interface’s scheduler must be on for the ticket to go out |
Permissions
There are three Tools, separated on purpose — whoever opens a ticket does not need to be able to create a destination, and whoever creates a destination does not need to be able to activate a tool:
| Tool | Grants | Levels |
|---|---|---|
Help Desk (/ticket-connectors) | The Help Desk tab under Parameters | View · View and edit |
ITSM Configuration (/ticket-destinations) | ITSM Configuration | View · View and edit · Full access |
Open Ticket (/manual-tickets) | The Open ticket button on a failed message | Allow |
The destination list in the Open ticket popup does not depend on the user having the tool’s Interface on their profile — an operator does not need it. What is protected there is the Application named in the ticket: only the Applications the user is allowed to see show up.
Common problems
| Symptom | Likely cause |
|---|---|
| Test connection says the tool redirected | Wrong base URL, or the instance is hibernating — ServiceNow developer instances go to sleep when unused |
Test connection returns 401 in ServiceNow | Signing in with the developer portal e-mail, which is not an instance user |
Test connection returns 403 | The credential got in, but a permission is missing: the itil role in ServiceNow, API access in GLPI |
GLPI answers ERROR_NOT_ALLOWED_IP | The GLPI API client only accepts localhost out of the box — allow the IP range |
| GLPI answers HTTP 500, “An unexpected error occurred” | A name instead of an id in category or group (itilcategories_id, _groups_id_assign) |
| The ticket opens, but without a number in CMS | Ticket number path differs from the real response — check it in the message |
| The manual ticket description does not show up | The destination body does not use {{alertaDetalhe}} |
| A ticket shows as Skipped | An alert about the tool itself, or there is already an open ticket for that alert and destination |
| SAP PM notification stays “waiting” forever | The scheduler of the Delivery’s Interface is off — turn it on in Schedulers. SAP PM’s Test connection flags it |
| The SAP PM notification “is created” but does not exist in SAP (IW23) | The Delivery does not save in the same session: BAPI_ALM_NOTIF_SAVE under “Call next” or the commit is missing |
| The destination does not show up in a message’s Open ticket | Available for manual opening is off |
| The Open ticket button does not show up on a message | The message has not failed, it is itself a ticket, the profile lacks the Open Ticket Tool, or there is no active destination with Available for manual opening |
| The destination does not show up in Open a ticket in, in the alert settings | Available for manual opening is on — it belongs to manual opening |
| The opening time in GLPI is ahead | GLPI time zone: turn on time zones and the instance default, then sign in again — the open session keeps the old time zone |